In-situ screening of crystals in crystallization plates has been implemented at BioMAX in 2023. Data collection is carried out with MXCuBE. So far, only on-site experiments are possible. Work to use the beamline Sample Changer to mount and exchange plates from MXCuBE is ongoing.
Because in-situ expriments involve exchange of the standard goniometer head, they involve a longer than normal setup. Therefore it is better to book separate shifts for this type of experiment (not on the same beamtime as standard cryo-data collection)
So far the following plate types have been tested extensively with the BioMAX plate adaptor:
- Swissci (low profile)
- CrystalDirect
- In Situ-1
We recommend In Situ-1 or CrystalDirect because of the lower background. If you have In Situ-1 plates contact us in advance, since it is not obvious where to set up the crystallization drops.
The plate holder also can hold other plate types. If you want to use a different type please let us know so that we can check if it is compatible with the diffractometer adaptor and establish the correct configuration prior to the experiment.
EXI at MAX IV does not yet support entering crystallization plate crystal information, so this step is not done in advance of the beamtime. Sample creation is done directly in MXCuBE.
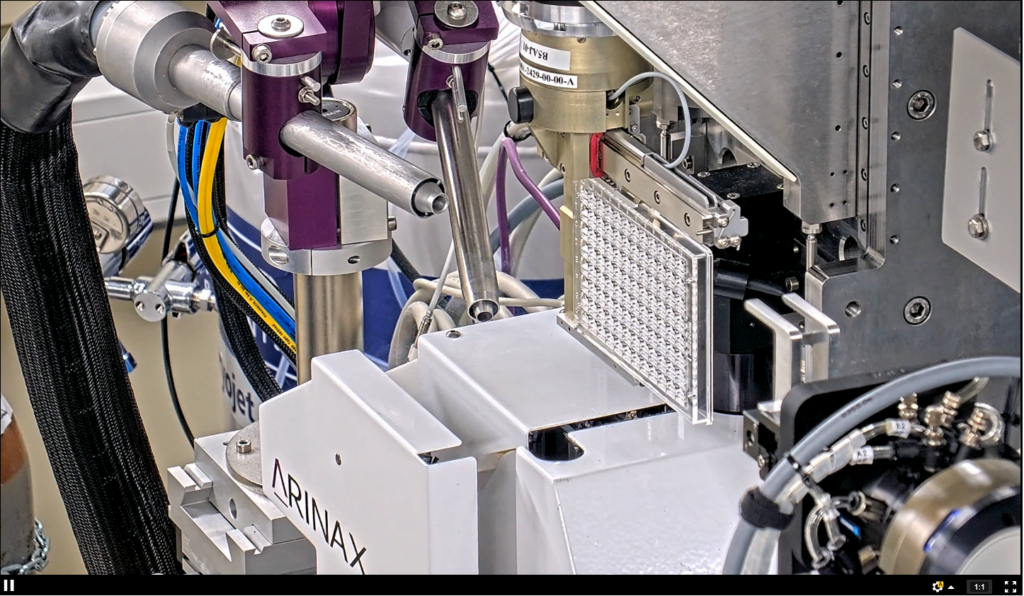
The first step of the experiment is to mount the sample in the plate adapter. This is usually done by hand, since at present MXCuBE lacks the commands to operate the sample changer in the plate configuration.
-
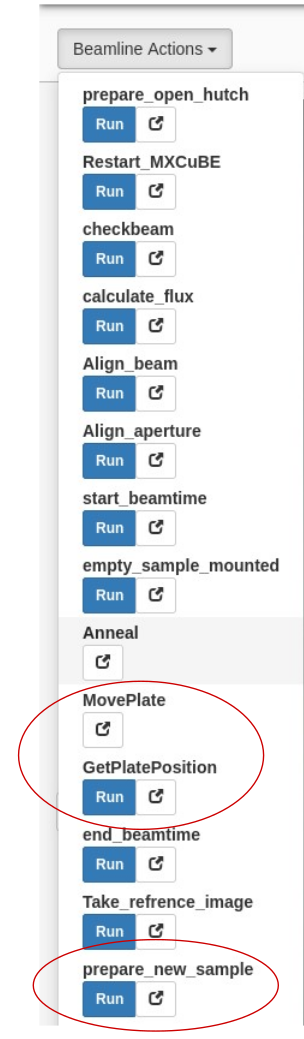
- In the MXCuBE Data collection tab, open the Beamline Actions drop down menu and select prepare_new_sample. This will automatically place the MD3 diffractometer in transfer mode, move the detector back and close the safety shutter to allow opening the hutch.
- Place the plate on the adaptor. Staff will train you on how to do this.
- Search the hutch.
- Back to MXCuBE, create a sample. The detailed instructions can be found in the “Mounting Samples manually” section of the MXCuBE user guide. The protein acronym and sample name you provide will be used to name the data directory and files. They may only consist of numbers and letters and the characters “-” and “_”.
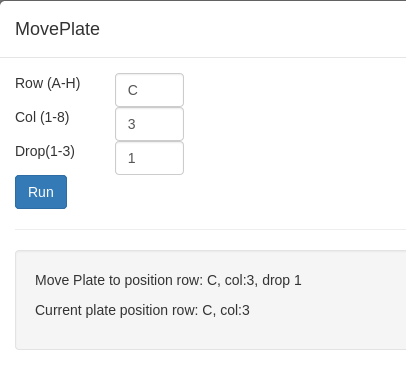
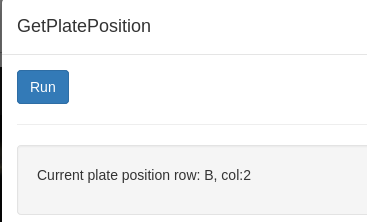
- From the Beamline action menu select MovePlate. This command opens an input window where you can type the well coordinates, and, if applicable, the drop number. The software will translate the plate automatically. You can keep track of what the current plate is with GetPlatePosition.
- In an optimal case, the drop and the crystals will be at least partially visible, Make sure that you are at the smallest zoom level and translate the plate until you locate the drop. If the plate is somewhat away from the MD3 center of rotation, it can be blurry. Instead of playing too much with the focus, try running three-click centering on any feature you can see inside or by the drop. Because the range of rotation of the plate is restricted to a maximum of 30 degrees, you may have to run three-click centering several times to obtain a good focus. Fortunately, once you have completed this step for the first drop, the rest of them should be already in focus.
- If you can distinguish the crystals clearly, you can center them individually and collect data from several of them, since you can only collect at most 30 degrees of data from each.
- Right click on the point created by the three-click centring procedure and add a data collection as described in the MXCuBE documentation.
- The plate should end at -35 degrees position after the three-click centring procedure. We recommend collecting 300 images from -35 to -5 degrees, with a 0.1 degree oscillation per image, using an exposure time per image of 0.01 s (instead of the usual 0.002 s), to prevent the omega motor going beyond the limit during deceleration. If data collection fails, try 280 images from -24 to -4 degrees.
- Since the tolerable X-ray dose at room temperature can vary considerably between samples, the optimal value transmission is difficult to predict. You may start with a value around 10 % for an exposure time of 0.01 seconds per 0.1 degree, and check the autoprocessing results from the same crystal before collecting from others. Avoid using crystals laying next to the right or the left of the irradiated crystal, since they may be partially irradiated too.
- Remember that it is possible to create and save several points (on different crystals) and queue the data collections. This can save time if there are several crystals in the drop.
- If you cannot see the crystals by eye, try doing a mesh scan over the drop. If the drop is very large, do several mesh scans, since a mesh scan can fail if you scan over a very large surface area. If you have microcrystals, you may be able to process the individual shots as a SSX data set. Consult the data processing guide.
- Once you have finished screening a drop, create a new sample, and move to a different position of the plate.
Currently the flux calculation is turn off for in situ experiments, since it is impossible to ensure that the beam would not hit any samples during the measurement. The “calculate_flux” script under the Beamline Actions menu does not work either. If you want to have an estimate of the flux (eg., for a dose calculation), please run the Beamline Action “checkbeam”. Please make a note of the value, since it is not written out to ISPyB.