X-ray single crystal data collection at cryotemperatures has become a very streamlined and well defined experiment, very amenable to automation. While some projects still require crystal characterization careful tweaking on experimental parameters to optimize the data quality, many high throughput experiments involve reasonably reproducible crystals in terms of size and diffraction properties. The automated data collection implemented newly at BioMAX is well suited to the latter, often resulting in data quality comparable or better that can be obtained by manual control of the experiment.
The automated data collection mimics the usual flow for cryo MX experiments. The first steps in the experiments (shipment preparation, logging in to MXCuBE and selecting the samples to be collected) are done manually:
- The sample information (protein acronym, sample names, and, optionally, the data collection parameters (diffraction plan) are imported upon login to MXCuBE.
- The samples to be measured in automated mode are selected in the sample view tab of MXCuBE.
-
- If a diffraction plan is not present in the sample list, a data collection can be defined for all the selected samples by right clicking on one of the sample cards and selecting “Add data collection” from the menu options. Add all the relevant data collection parameters and click on “Run” to start the data collection. Note: You cannot add different strategies for different groups of samples or define the beam size if you choose to set up the data collection parameters in MXCuBE. In order to do that, the diffraction plan needs to be provided in ISPyB. It is very important to the check that the beam size is correct before data collection, since it can change following a MXCuBE server restart!
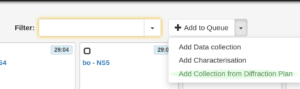
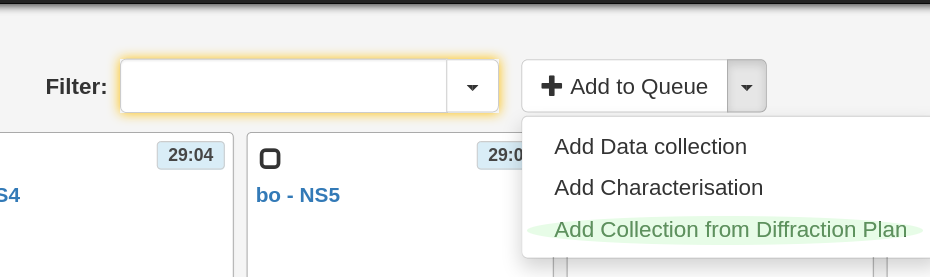
Selecting a diffraction plan previously uploaded to ISPyB - If the diffraction plan has been imported into ISPyB, use the drop down menu at the top of the page to select “Add collection from diffraction plan” . This will display a (non editable) list of data collection parameters for all the samples. MXCuBE will also do a sanity check at this point: Nonsensical parameters for the data collection will be shown in read, and the sample will be skipped.
-
- Click on the “Add diffraction plan” button on the right bottom corner of the list to generate the data collection queue for all the selected samples to the queue.
- Initiate the queue. Once the queue starts, each sample will be mounted on the goniometer and autocentered, snapshots will be taken. X-ray based centering will be carried out, followed by data collection and autoprocessing. The queue can be stopped or paused (if paused, the current task will continue running until it is finished). Note: Be careful not to reselect samples that have already been selected for data collection. If you do this, you will see that two data collection tasks appear in the sample card and the data collection will be done twice.
The diffraction images can be inspected with Albula or Adxv, and the autoprocessing results are written out the EXI as usual. In addition, the user logged in to MXCUBE will receive an email reporting the status of the queue after each 20 samples.
If an error occurs during data collection, the queue will just skip the remaining steps and move to the next sample. A relatively common error happens when the X-ray centering fails to locate diffraction from the crystal. Often this means that the crystal does not diffract well or not alt all, but you can also double check in the sample snapshots in EXI. You can remount individual samples at the end of the automated data collection and test them manually in case of doubt. We recommend changing to manual data collection mode to recollect samples
Certain severe errors will cause the queue to stop. You will get an email in this case. These are usually the same type of errors that would also interrupt the normal manual experiment. Consult the “known issues” section in the MXCuBE documentation. If the problem is not something that you can resolve yourself, please contact staff.
If many samples are queued for automated collection, it may take a while for MXCuBE to update the sample information at the end of the data collection. The interface will be inactive during this time. You can either wait a little or refresh the browser. Note that in the case the connection ISPyB may be lost. If the happens, go to the Sample Overview tab, click on “Clear samples” and then resync to ISPyB.
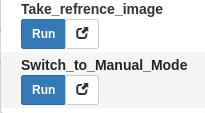
- Currently, a special version of MXCuBE is used to run automated data collection. This version needs to be enabled by staff. However, users can go back to the manual collection version by clicking the “Switch back to manual” button in the Beamline Actions. Note that this will restart the MXCuBE server, so a log in is required afterwards. In the future, we plan to have a single MXCuBE that can handle both automated and manual data collection.
- Only rotation data collection around one point is supported in automated mode: no helical data collection or energy and XRF scans can be executed automatically.
- No strategy is calculated. The automated data collection is suited for work on previously characterized samples. However, in some cases it should be possible to do a quick sample characterization before initiating automated data collection. Please discuss this possibility with staff. Also, if it becomes obvious that the initial diffraction plan is not optimal, it is possible to stop the queue, redefine the data collection parameters for that group of samples, and restart.
- The xia2dials pipeline is currently disabled for automated data collection. This is to avoid these jobs slowing down the autoprocessing queue (the data throughtput is consistently faster for most automated experiments).
-
- Can you often use the same beam size to collect data from different crystals of a particular protein?
- Do you know what resolution to expect?
- Are the crystals at least 20 microns in the smallest dimension?
- Have you already collected data from the crystals at MAX IV?
If you answer yes to all the questions, automated data collection will be useful. If your crystals are needles or long plates, manual helical collection is in principle a better way to collect data, depending on how well the crystals tolerate the dose absorbed during data collection.
To improve the resolution of the video, change the “Quality” setting (under the cogwheel icon below the video) to 1080p.